 AppVerz
Blog / 4 November 2026
Your first ten minutes with SweepyMac
Install, one permission, a three-day trial and a first scan. What happens at each step, what to say yes to, what you can safely skip, and how to read the screen that comes back before you press Clean.
The first few minutes with a Mac cleaner set the tone. Most of them open with a scan you did not ask for, a large red number, and a button that cleans everything at once. SweepyMac is built to do the opposite, and the clearest way to show that is to walk through what actually happens from download to first clean.
Installing
Open the installer. It copies SweepyMac into your Applications folder and verifies the app's signature as it goes. If an older copy of SweepyMac is already running, quit it first.
The app is notarized by Apple, so it opens like any other download: macOS shows its usual "downloaded from the internet" confirmation on first launch, and nothing more. If you ever see an "unidentified developer" warning instead, you have an old preview build; install the current version.
The one permission
On first launch SweepyMac asks for Full Disk Access, once. It is worth understanding what you are being asked, because it is the only permission prompt in the app.
The things worth cleaning on a Mac, caches, logs and the leftovers of deleted apps, live outside any app's sandbox. Without Full Disk Access, macOS asks about folders one at a time as a scan reaches them, and quietly skips some, so the scan under-reports. With it, the scan can see every corner at once. SweepyMac uses the permission for the scans you start and for nothing else.
To grant it, turn SweepyMac on in System Settings, under Privacy & Security, then Full Disk Access, and choose Quit & Reopen if macOS asks. To skip it, skip it. The app runs perfectly well without it, scans cover what macOS lets a normal app read, and a banner on the scanners offers the permission again later. We wrote a whole post on what Full Disk Access grants if you want the detail before deciding.
The trial
A three-day free trial covers the full app, every module. The licence badge at the bottom of the sidebar shows where you are; when the trial ends, a licence key activates it beyond that. There is no account to create at any point. Plans and how keys move between Macs are covered in their own post.
Your first scan
Start with Smart Scan, the first item in the sidebar (⌘1). Press Scan, or ⌘R, which scans whatever screen you are on.
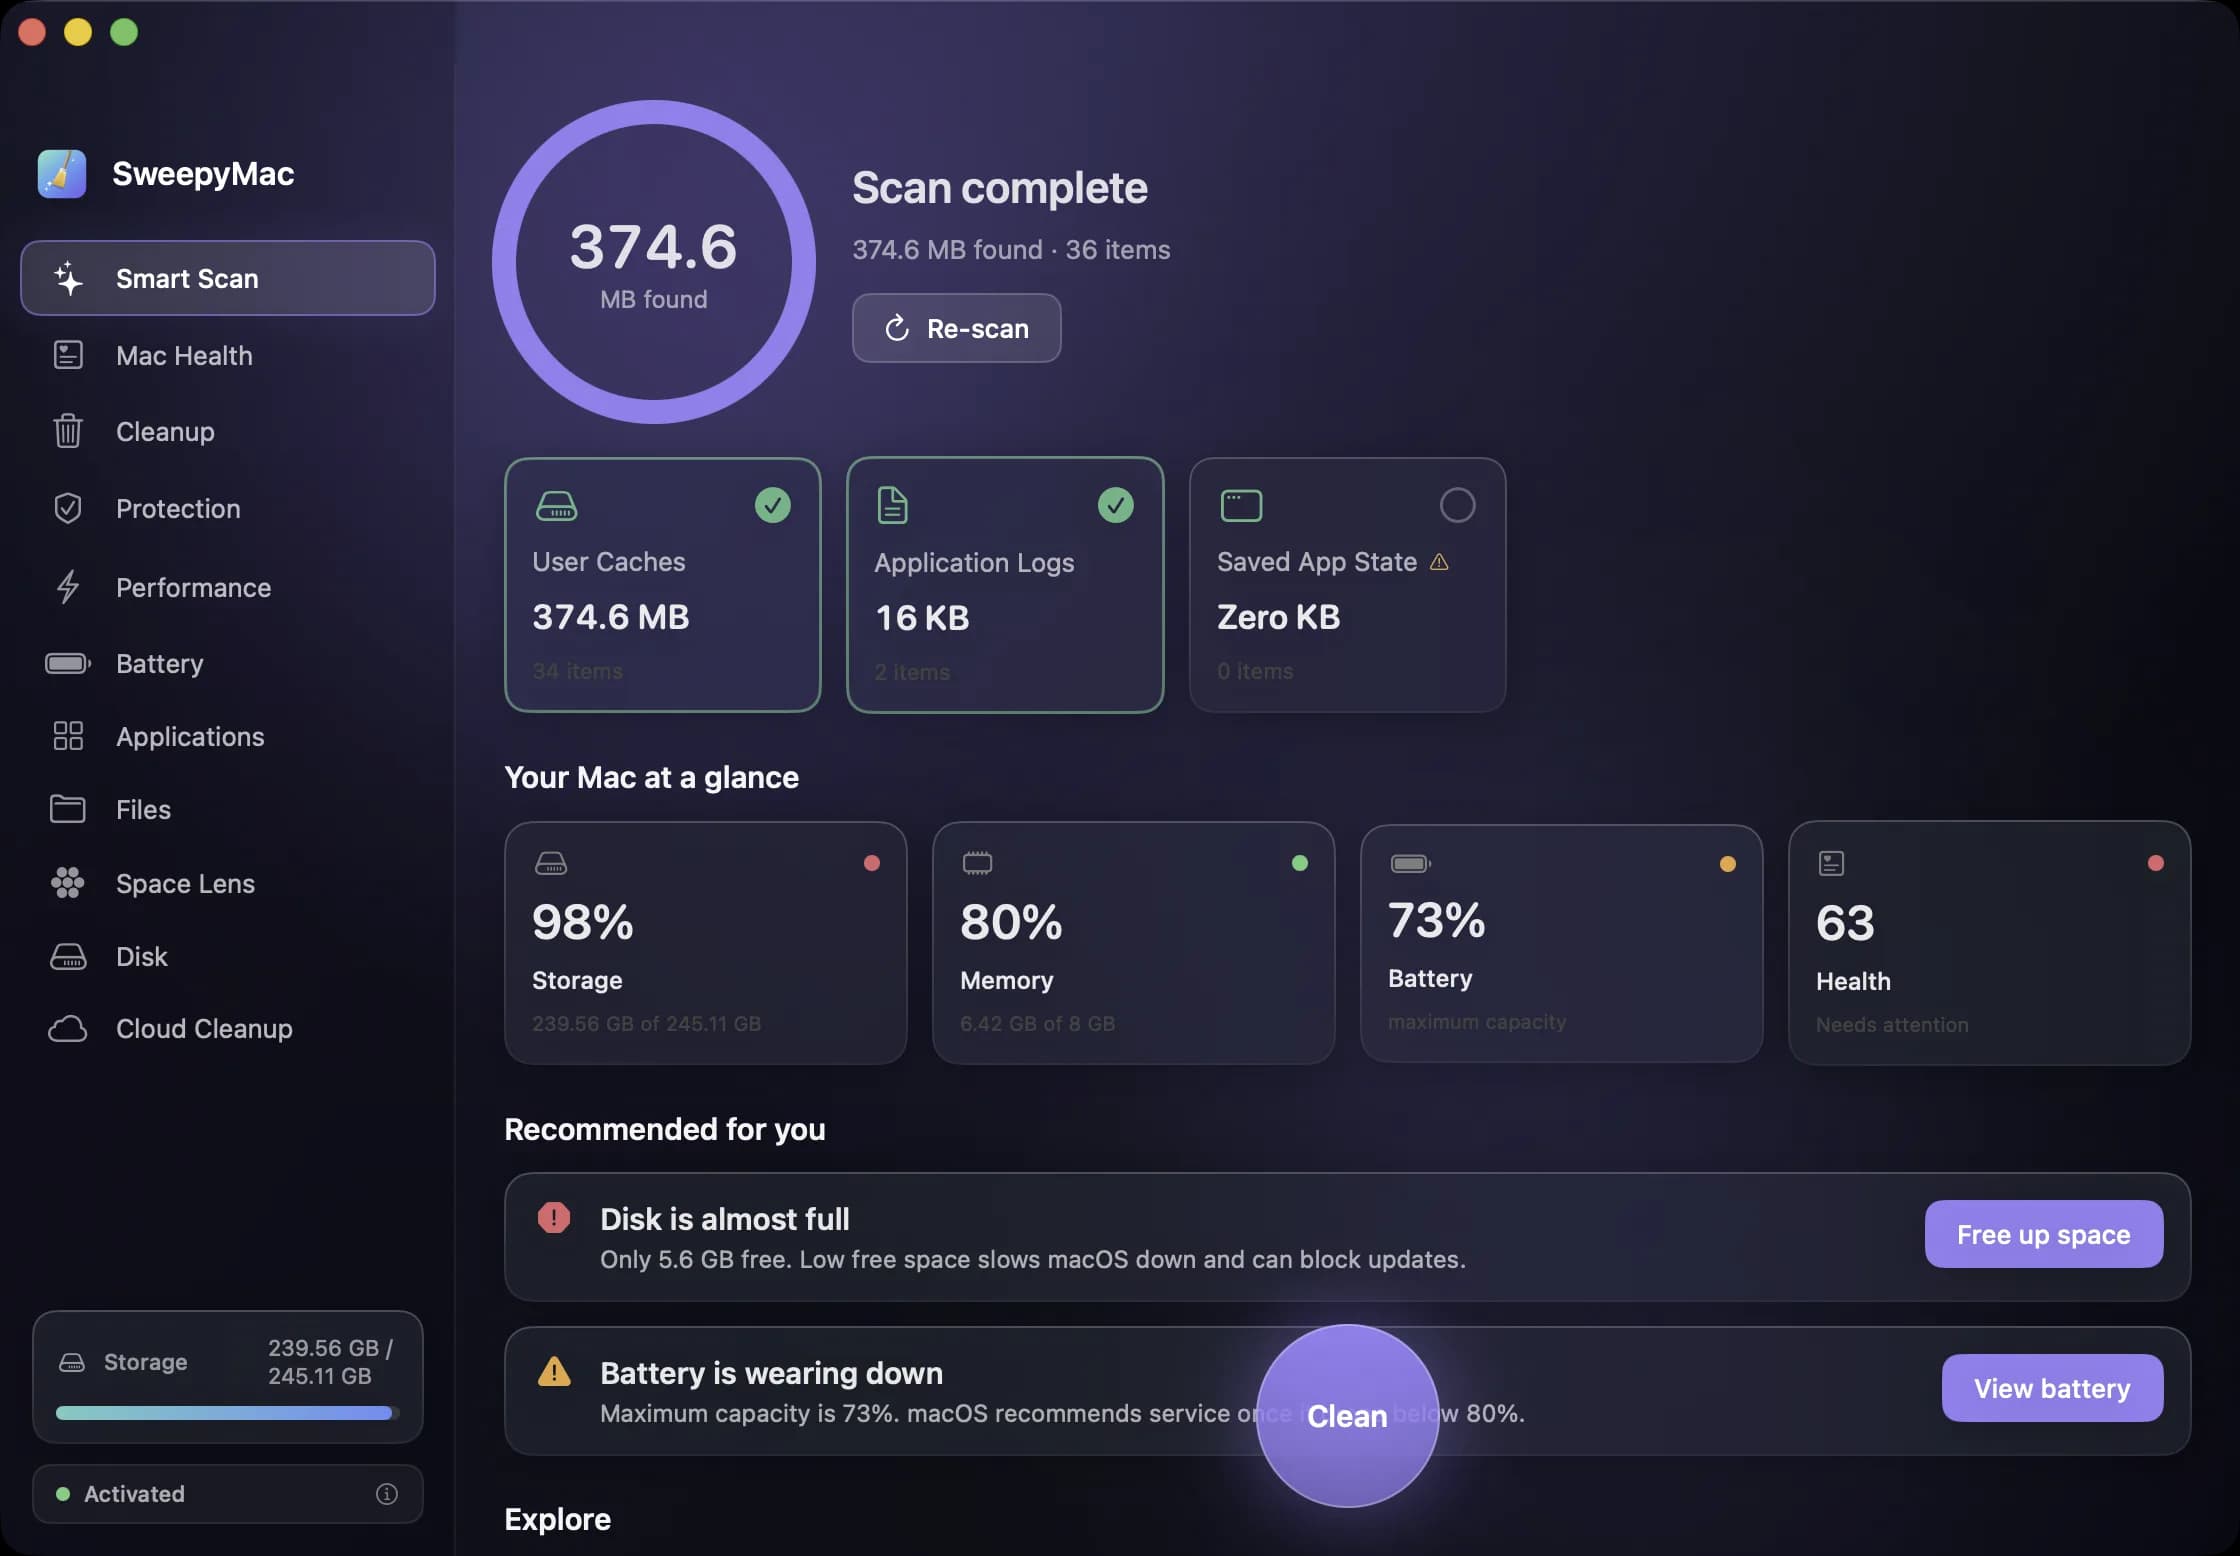
Smart Scan sweeps three categories in one pass: user caches, application logs and saved app state. These are the conservative ones, the things apps rebuild on their own and you will not miss. Bigger and riskier categories, such as developer caches and the leftovers of deleted apps, are deliberately not part of it; they live in Cleanup, listed but unticked. The difference between the two is the subject of another post.
When the scan finishes you get a ring with the total found, one card per category with its size, and, underneath, your Mac at a glance: tiles for storage, memory, battery and health.
Reading the result before you clean
This is the step that matters, and the one most cleaners hurry you past. Before pressing anything:
Open a card. Every group opens up to show the files inside it. Hovering an item shows a note on why it is considered safe to remove. You are never asked to approve a number; you can always see the list behind it.
Look for an orange triangle. A triangle on a category means some folders could not be read, so that list may be incomplete. Usually it means Full Disk Access is off, or macOS protects a particular folder. The post on what SweepyMac cannot see explains every case.
Read the recommendations. Under the tiles, Smart Scan lists recommendations as sentences, not codes: "Disk is almost full", "Battery is wearing down", "Time to restart". Each has a button that jumps to the module that deals with it.
Untick anything you want to keep. Only the conservative categories arrive pre-selected, and you can change any of them.
Then press Clean.
After the clean
A result bar appears reading "Freed" and the amount, with an Undo button. Everything that was removed went to your Trash, not to permanent deletion, and stays there until you empty the Trash yourself. If something you needed turns out to have been a cache, Undo puts it back, and so does dragging it out of the Trash.
That is the pattern for the whole app: scan, review, act. Nothing is removed until you tick it and confirm, and almost everything you remove can be put back.
Where to go next
With the first scan done, three places are worth a look in the first session:
- Mac Health (⌘2), for one score out of 100 and what is pulling it down. Each part is explained in the Mac Health post.
- Files (⌘8), pointed at your home folder with a size floor of a few hundred megabytes, to see what is actually taking the room.
- Disk, in the sidebar, for the whole volume drawn to scale. It is read-only, so there is nothing to worry about clicking.
The full list of modules and shortcuts is in the user guide, and SweepyMac's page has the download and a walkthrough video with chapters for every module.
Questions people ask
- Do I have to grant Full Disk Access?
- No. SweepyMac asks once on first launch and you can skip it. The app still runs; it sees less, says so, and a banner on the scanners offers the permission again whenever you want the complete picture.
- What does the trial include?
- The full app, for three days. The licence badge at the bottom of the sidebar shows the trial's state, and a licence key activates the app beyond that.
- What happens if I clean something by mistake?
- It is in the Trash. After every clean, a result bar reads Freed and the amount, with an Undo button, and the files stay in the Trash until you empty it yourself.
Related reading
- A monthly Mac routine in fifteen minutes, from the keyboardEleven modules is a lot to remember. This is the order we use them in once a month, with the shortcut for each: scan, check health, look for threats, find the big files, hand space back to iCloud, and only then empty the Trash.
- What a Mac cleaner should never doMost cleaning apps ask you to trust them. SweepyMac is built so you do not have to: everything it removes goes to the Trash, every clean has an Undo, and every group opens up before you press anything.
- Smart Scan or Cleanup? What one click cleans, and what it deliberately leaves aloneSweepyMac has a one-click scan and a full Cleanup module, and they are not the same thing. Here is exactly what each one touches, which categories start unticked and why, and the folders neither will ever offer you.
Have a question about any of this?
Write in. The person who built the apps reads every message and replies within two working days.